
Source control, development and deployment of Azure Functions using Visual Studio
azure azure-functions deployment In my last post on Achieving Enterprise Scale with Azure Functions, I gave a high-level overview why and when to use Azure Functions and some basics around how they work. As a continuation, I’d like to dive a little deeper and share some things I’ve learned around development process from within Visual Studio. Throughout this post, I will be referencing an example implementation I created on GitHub if you want to follow along.
Getting started
Let’s go create a simple web order storage and retrieval application using only Functions. Open up the Azure Portal and create a new Function App. Creating this resource will also require a Hosting Plan (select “Dynamic Plan” for now) and a Storage Account (create a new one), which are the only two other resources you need for a fully-functioning application because Functions interact with Storage Queues and Tables, which are what we’ll use to respectively trigger and store inbound order data. This is why Azure Functions are commonly called “serverless,” because note that you did not have to provision any real infrastructure to run the app.
My resource group looks like this:
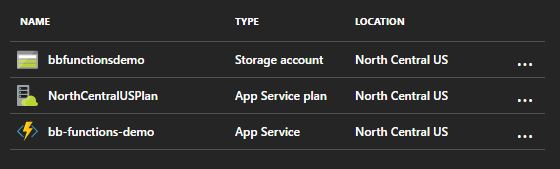
The Functions application will contain three functions: CreateOrder as a webhook, StoreOrder to parse and store the inbound order in a Table, and GetStoredOrder to retrieve a stored order via HTTP GET. This is another example of a decoupled architecture, where each Function is responsible for a single operation. It also allows us to disconnect the inbound traffic handling from actual order processing, which would enable us to scale the order handling separately from our external API. Here is a simple diagram of this solution:
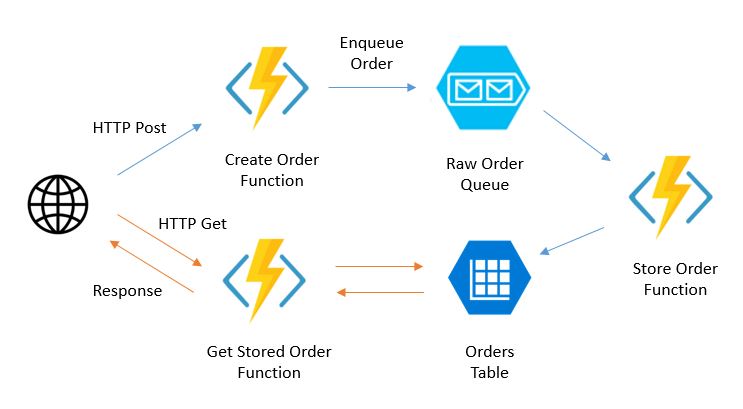
Now that we have provisioned our resources, let’s create our first Function.
Creating a Function via the Azure Portal UX
Select your newly-created Function App from the portal – notice that instead of typical blades, it opens up a special UX built just for Functions. This UX allows you access to the underlying App Service, but also to create Functions right from the browser. We’ll start there and talk more later about how to integrate this with source control.
Click New Function, then select GenericWebHook-CSharp. This generates an example function that is triggered by a POST request to the Function Url (make sure to include the “code” parameter), but does little else at the moment. To connect the Function with other Azure resources, click the Integrate tab under the Function name on the left bar. This provides all of the binding options we need to complete this first Function. Under Outputs, click New Output then Azure Queue Storage.
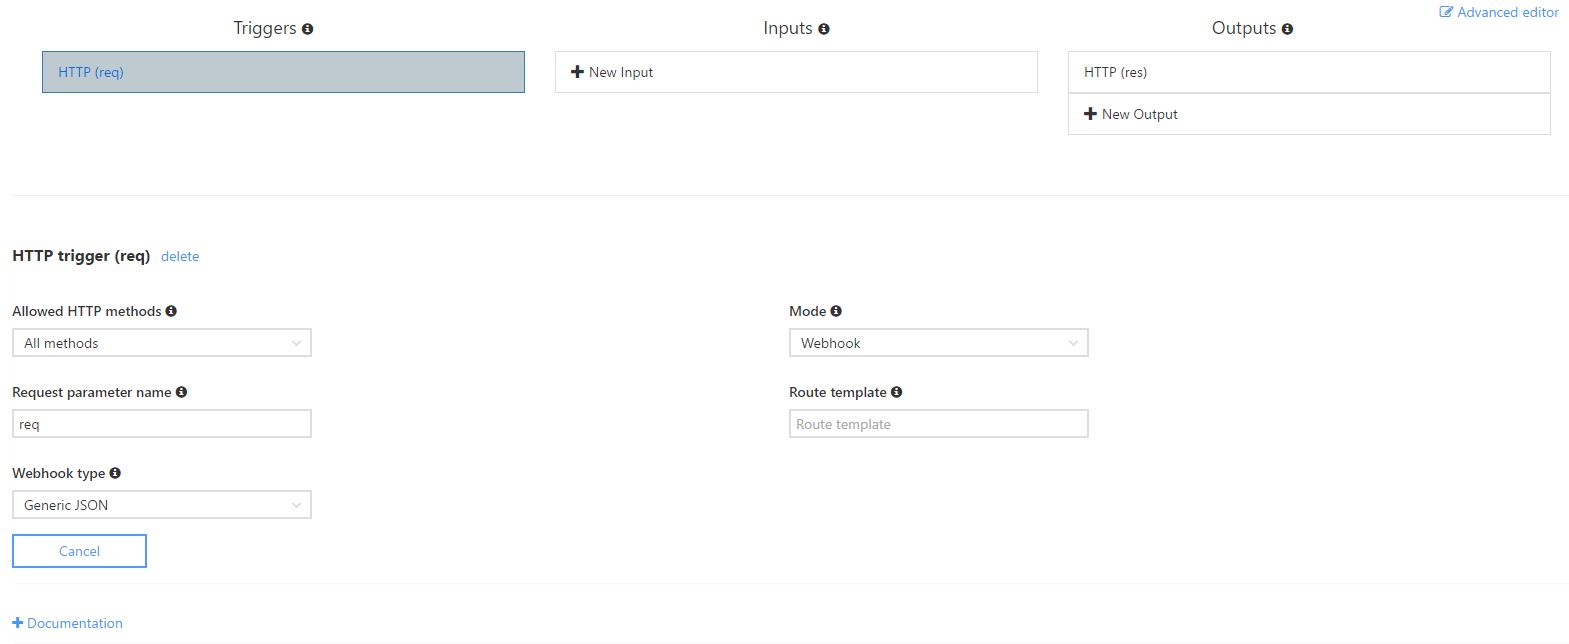
Behind the scenes as you click through this UX, it’s really storing off configuration changes to your function.json file, which is how all of the bindings of Functions are defined. Let’s call the message parameter ordersQueue and the queue name orders-raw since we’re passing in raw requests directly from the request object. Since you have already defined which storage account you want your Function App to use, it has already pre-selected your connection string. Now you have a binding set up, so head back to the Develop tab.
For whatever reason, updating the function.json doesn’t also update your Function code, but we can do that manually. To your Run method, add a IAsyncCollector<string> ordersQueue parameter which will automatically pass in a reference to your new queue. This is one of the most elegant parts of Functions: it removes the need to write any code that integrates with Azure resources by doing all the binding work for you in the background.
The IAsyncCollector<T> represents a reference to a storage resource, and is at least usable on queues and tables. Type T can be a model defined in your Function or external library (more on that later), and it handles serialization for you in both directions. Interacting with the IAsyncCollector<T> is as simple as calling AddAsync(T object) to add your message to the queue, and when the Function returns, the message is enqueued. Here’s the source code for the rest of our Function:
public static async Task Run(
    HttpRequestMessage req,
    IAsyncCollector ordersQueue,
    TraceWriter log)
{
    string rawOrder = await req.Content.ReadAsStringAsync();
    log.Info($"Received new order: {rawOrder}");

    try
    {
        await ordersQueue.AddAsync(rawOrder);

        log.Info($"Successfully enqueued order");
    }
    catch (Exception ex)
    {
        log.Info($"Error receiving data: {ex}");

        // handle exception for further processing. consider handling different exceptions separately,
        // where some might cause retries (as thrown exceptions, which will cause a requeue) and others
        // might store poisonous messages to a new {queueName}-error queue
    }
}
Note that we didn’t return anything - that’s OK, this will add the rawOrder to the queue once the Run method exits. That’s it for our first Function, which is now available at https://[function-app-name].azurewebsites.net/api/CreateOrder?code=[code] as an external webhook. To test, click Test in the upper right of the UX, add a JSON request body and click Run. Using the Azure Storage Explorer, check out your queues in your storage account; there should be a new orders-raw queue that contains the JSON message body you just posted.
Adding Functions to Visual Studio and source control
The Function we just created is relatively simple and contains almost no logic. Since we’re probably building Functions that are part of a larger solution, it makes sense to include them as part of your Visual Studio solution. A few benefits of doing so include:
- C# Scripts (*.csx) don’t allow for Intellisense and can get bloated with logic very quickly. In order to manage complexity, current best practice is to build C# services into DLLs and import those into your Functions.
- Functions are currently somewhat difficult to test, but C# class libraries aren’t. It’s a good idea to create unit test projects alongside these libraries to test them before your Functions even gain access.
- Importing your code and configuration into Visual Studio allows you to include all changes into the same source control you’re using for the rest of the solution.
- Function Apps are just slimmed down Web Apps, which means that they are deployable using the same methods you’re already using elsewhere like VSTS Build & Release or Web Deploy.
To add your Function to Visual Studio, open up a new solution and add a new ASP.NET Web Application project. Once created, you can delete the web.config and all references except for the Microsoft.CoreDom.Providers.DotNetCompilerPlatform package (found that out the hard way). The web application you just created won’t include any C# code, but can reference your class libraries in the same solution which will deploy them to a shared bin in your Function App, which can be referenced by all of your Functions! Let’s see how that works in my BB.OrderFulfillment.Functions web project:
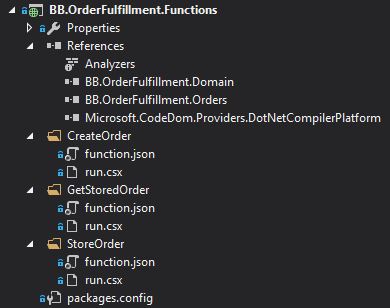
The project is empty of most of the extras that usually come with an ASP.NET MVC project, leaving just a file system structure and library references. When you deploy this project to Azure as a Function App, it creates a file system structure under your application’s wwwroot that looks like this:
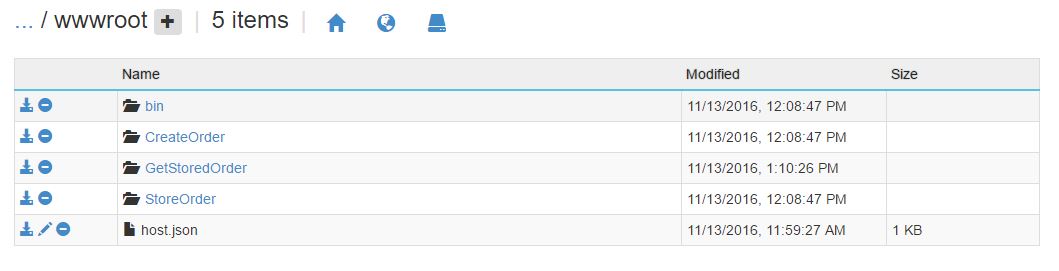
One of the most important things to notice is the bin directory, which now contains any of the DLLs that we referenced from the Functions project. C# Script files allow us to reference custom DLLs and use them as part of our Functions. A simple example is the GetStoredOrder Function, which references a few of my custom libraries’ strongly-typed models:
#r "Microsoft.WindowsAzure.Storage"
#r "Newtonsoft.Json"
#r "../bin/BB.OrderFulfillment.Domain.dll"
#r "../bin/BB.OrderFulfillment.Orders.dll"

using System.Net;
using Newtonsoft.Json;
using BB.OrderFulfillment.Domain.Models;
using BB.OrderFulfillment.Orders.StorageModels;

public static async Task Run(
    HttpRequestMessage req,
    OrderEntity orderEntity,
    TraceWriter log)
{
    Order order = JsonConvert.DeserializeObject(orderEntity.SerializedOrder);

    log.Info(order.ToString());

    return req.CreateResponse(HttpStatusCode.OK, order);
}
The #r notation here allow you to reference DLLs using relative paths, which means that it enables you to use the bin as a shared DLL library resource. Since we have referenced the DLLs using #r, we can then use the standard using keyword to pull in the namespaces that we need.
Deploying an Azure Functions application
Since your Function App is now represented as a web application in your Visual Studio solution, the deployment procedure is no different than any other web application. To set up a publish profile, right click your Functions project and select Microsoft Azure App Service as the publish target. Select your Function App from within your subscription and resource group and click OK. At this point, clicking Publish will push up all of your Functions, and will also publish all DLLs that your Functions project is referencing (remember to actually add the reference, else your #r notation won’t work because the DLL won’t publish).
Since Function Apps are based on Web Apps, you can also leverage deployment slots the same way you otherwise would to ensure that your Functions are working as expected, and then can swap them into production. On top of that, you can configure App Settings right through the portal and use them as environment variables by running System.Environment.GetEnvironmentVariable("AppSettingName", EnvironmentVariableTarget.Process) within your Function, which is a slot-specific setting. This means you not only have an infrastructure-less application, but it comes with the ability to easily create separate environments by using slots (since they don’t share the same App Service resources).
Click Publish and you should see the usual, comforting healthy app screen:

That’s it - you now have a serverless application running on Azure Functions. Not as hard as you thought, I hope!
Share this post!